はじめに
これまで以下3つのログイン機能の実装をしてきました。今回は、それぞれの記事の内容を全て反映した全体のコードを記載します。
・【SwiftUI】IDとパスワードでログインする画面を実装する - Swift・iOS
・【SwiftUI】LINEログインの実装 - Swift・iOS
・【SwiftUI】Sign In with Appleの実装 - Swift・iOS
開発環境
・Xcode 12.0.1
・Swift 5.3
・CocoaPods 1.10.0
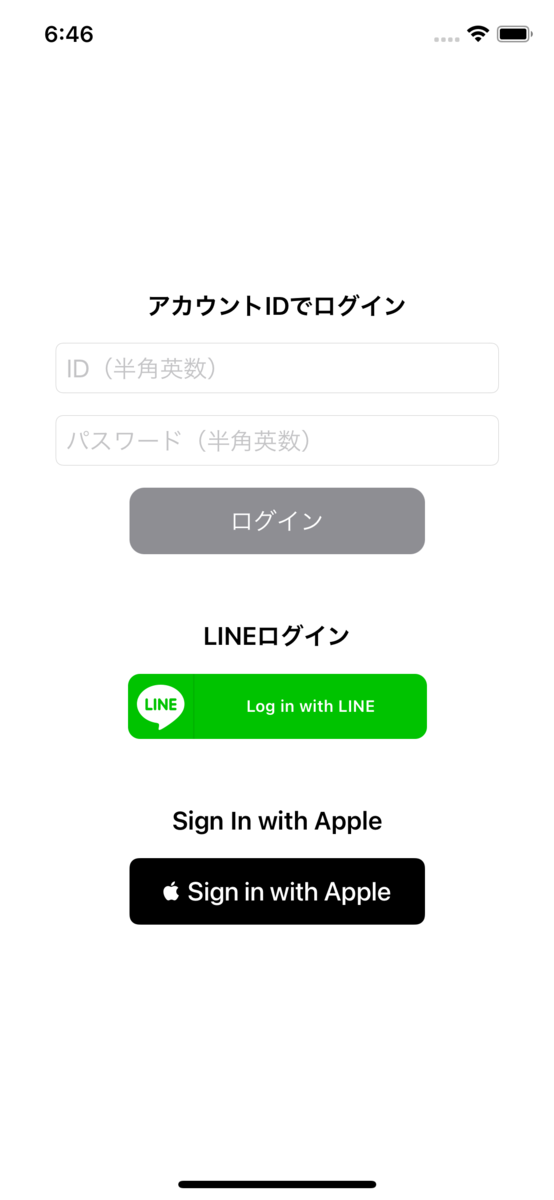
実装イメージ
・IDとパスワードでのログイン、LINEログイン、Sign in with Appleを表示
・IDとパスワードでのログインはそれぞれの入力文字が半角英数でないとログインボタンが有効にならない
・LINEログインの認証が成功した場合はLINEのアクセストークンをデバッグエリアに出力する
・Sign In with Appleの認証が成功した場合はデバッグエリアにユーザー識別子、フルネーム、メールアドレス、認証コードを出力する

実装
AppDelegate.swift
import UIKit
import LineSDK

@main
class AppDelegate: UIResponder, UIApplicationDelegate {

    func application(_ application: UIApplication, didFinishLaunchingWithOptions launchOptions: [UIApplication.LaunchOptionsKey: Any]?) -> Bool {
        // LINE SDKを設定
        LoginManager.shared.setup(channelID: "{チャネルID}", universalLinkURL: nil)

        return true
    }

    func application(_ application: UIApplication, configurationForConnecting connectingSceneSession: UISceneSession, options: UIScene.ConnectionOptions) -> UISceneConfiguration {
        return UISceneConfiguration(name: "Default Configuration", sessionRole: connectingSceneSession.role)
    }
}
SceneDelegate.swift
import UIKit
import SwiftUI
import LineSDK

class SceneDelegate: UIResponder, UIWindowSceneDelegate {

    var window: UIWindow?

    func scene(_ scene: UIScene, willConnectTo session: UISceneSession, options connectionOptions: UIScene.ConnectionOptions) {
        // 起動後の画面をログイン画面に設定
        let viewModel = LoginViewModel()
        let loginView = LoginView(viewModel: viewModel)

        if let windowScene = scene as? UIWindowScene {
            let window = UIWindow(windowScene: windowScene)
            window.rootViewController = UIHostingController(rootView: loginView)
            self.window = window
            window.makeKeyAndVisible()
        }
    }

    // URLでアプリが開かれた場合に実行される
    func scene(_ scene: UIScene, openURLContexts URLContexts: Set<UIOpenURLContext>) {
        _ = LoginManager.shared.application(.shared, open: URLContexts.first?.url)
    }
}
LoginView.swift
import SwiftUI
import AuthenticationServices

struct LoginView: View {
    @ObservedObject var viewModel: LoginViewModel

    init(viewModel: LoginViewModel) {
        self.viewModel = viewModel
    }

    var body: some View {
        VStack(spacing: 15) {
            Text("アカウントIDでログイン")
                .bold()

            // 入力した文字をLoginViewModelの変数idに通知
            TextField("ID(半角英数)", text: $viewModel.id)
                .textFieldStyle(RoundedBorderTextFieldStyle())
                .frame(width: 300)

            // 入力した文字をLoginViewModelの変数passwordに通知
            TextField("パスワード(半角英数)", text: $viewModel.password)
                .textFieldStyle(RoundedBorderTextFieldStyle())
                .frame(width: 300)

            Button(action: {
                // ボタンが選択されたことをLoginViewModelの変数isLoginButtonTappedに通知
                viewModel.isLoginButtonTapped = true
            }) {
                Text("ログイン")
            }
            .frame(width: 200, height: 45)
            .foregroundColor(Color.white)
            // ボタンの有効/無効状態に合わせて背景の色を変更
            .background(viewModel.isValidId && viewModel.isValidPassword ? Color.blue : Color.gray)
            .cornerRadius(10, antialiased: true)
            // IDとパスワードがどちらも半角英数で入力されていればボタンを有効にする
            .disabled(!viewModel.isValidId || !viewModel.isValidPassword)
            .padding(EdgeInsets(top: 0, leading: 0, bottom: 30, trailing: 0))

            Text("LINEログイン")
                .bold()

            LineLoginButton()
                .frame(width: 200, height: 45)
                .padding(EdgeInsets(top: 0, leading: 0, bottom: 30, trailing: 0))

            Text("Sign In with Apple")
                .bold()

            SignInWithAppleButton(.signIn) { request in
                request.requestedScopes = [.fullName, .email]
            } onCompletion: { authResults in
                viewModel.appleAuthResults = authResults
            }
            .signInWithAppleButtonStyle(.black)
            .frame(width: 200, height: 45)
        }
    }
}

struct LoginView_Previews: PreviewProvider {
    static var previews: some View {
        LoginView(viewModel: LoginViewModel())
    }
}
LoginViewModel.swift
import Combine
import AuthenticationServices

class LoginViewModel: ObservableObject {
    @Published var id: String = ""
    @Published var password: String = ""
    // TextFieldに入力した文字が半角英数かどうか判別する変数
    @Published var isValidId: Bool = false
    @Published var isValidPassword: Bool = false

    @Published var isLoginButtonTapped: Bool = false

    @Published var appleAuthResults: Result<ASAuthorization, Error>?

    private var disposables = [AnyCancellable]()

    init() {
        $id
            .sink(receiveValue: {
                self.isValidId = $0.isAlphanumeric && !$0.isEmpty ? true : false
            })
            .store(in: &disposables)

        $password
            .sink(receiveValue: {
                self.isValidPassword = $0.isAlphanumeric && !$0.isEmpty ? true : false
            })
            .store(in: &disposables)

        $isLoginButtonTapped
            .sink(receiveValue: { isTapped in
                if isTapped == true {
                    print("ここでログイン処理を呼び出す")
                }
            })
            .store(in: &disposables)

        $appleAuthResults
            .sink(receiveValue: { results in
                switch results {
                case .success(let authResults):
                    switch authResults.credential {
                    case let appleIDCredential as ASAuthorizationAppleIDCredential:
                        print("userIdentifier:\(appleIDCredential.user)")
                        print("fullName:\(String(describing: appleIDCredential.fullName))")
                        print("email:\(String(describing: appleIDCredential.email))")
                        print("authorizationCode:\(String(describing: appleIDCredential.authorizationCode))")

                        print("ここでログイン処理を呼び出す")

                    default:
                        break
                    }

                case .failure(let error):
                    print(error.localizedDescription)

                default:
                    break
                }
            })
            .store(in: &disposables)
    }
}
LineLoginButton.swift
import SwiftUI
import LineSDK

struct LineLoginButton: UIViewRepresentable {
    class Coordinator: NSObject, LoginButtonDelegate {
        var parent: LineLoginButton

        init(_ parent: LineLoginButton) {
            self.parent = parent
        }

        func loginButton(_ button: LoginButton, didSucceedLogin loginResult: LoginResult) {
            print("LINE認証成功")
            print("アクセストークン:\(loginResult.accessToken.value)")
            print("ここでログイン処理を呼び出す")
        }

        func loginButton(_ button: LoginButton, didFailLogin error: LineSDKError) {
            print("LINE認証エラー: \(error)")
        }

        func loginButtonDidStartLogin(_ button: LoginButton) {
            print("LINE認証開始")
        }
    }

    // Coordinatorを作成するメソッド
    // CoordinatorはUIViewRepresentableに準拠した構造体LineLoginButtonの状況(Context)の一部を
    // 他のSwiftUIのインターフェースに伝達できるようにする
    // そのため、作成したCoordinatorを使用して、デリゲート、データソース、ユーザーイベントへの応答などを実装できる
    // makeCoordinatorで生成したCoordinatorのインスタンスにはupdateUIViewの引数contextからアクセスできる
    func makeCoordinator() -> Coordinator {
        Coordinator(self)
    }

    // Viewを初期化
    func makeUIView(context: Context) -> UIView {
        let view = UIView()
        return view
    }

    // Viewの状態を更新
    func updateUIView(_ view: UIView, context: Context) {
        let loginButton = LoginButton()
        // makeCoordinatorで生成したCoordinatorクラスのインスタンスを指定
        loginButton.delegate = context.coordinator

        // 認証時にユーザーへプロフィール情報の取得について許可をとる
        loginButton.permissions = [.profile]
        // nilを指定すると、現在のViewController階層の最上位のViewControllerが使用される
        loginButton.presentingViewController = nil

        // makeUIViewで生成したViewにLINE SDKで用意されたLoginButtonを追加
        view.addSubview(loginButton)
        // ログインボタンのレイアウト設定
        loginButton.translatesAutoresizingMaskIntoConstraints = false
        loginButton.centerXAnchor.constraint(equalTo: view.centerXAnchor).isActive = true
        loginButton.centerYAnchor.constraint(equalTo: view.centerYAnchor).isActive = true
    }
}

struct LineLoginButton_Previews: PreviewProvider {
    static var previews: some View {
        LineLoginButton()
    }
}
String+Extensions.swift
extension String {
    // 半角英数かどうか判別
    var isAlphanumeric: Bool {
        return !isEmpty && range(of: "[^a-zA-Z0-9]", options: .regularExpression) == nil
    }
}
おわりに
LINEログインなど、まだまだ改善できる実装箇所はあると感じているので、まとめられそうな改善ができれば、改めて記事にしたいと思います。
参考
・詳細! SwiftUI iPhoneアプリ開発入門ノート iOS 13 + Xcode11対応 | 大重 美幸 |本 | 通販 | Amazon
・LINE SDK for iOS Swiftの概要 | LINE Developers
・プロジェクトを設定する | LINE Developers
・https://developer.apple.com/documentation/swiftui/uiviewrepresentable
・https://developer.apple.com/documentation/swiftui/uiviewcontrollerrepresentable
・https://developer.apple.com/tutorials/swiftui/interfacing-with-uikit
・https://help.apple.com/developer-account/#/dev04f3e1cfc
・https://help.apple.com/developer-account/#/dev77c875b7e