はじめに
Firebase Cloud Messagingで送信されたプッシュ通知を選択した時に、アプリの特定の画面に遷移する処理を実装してみたので記事に残します。
開発環境
本題
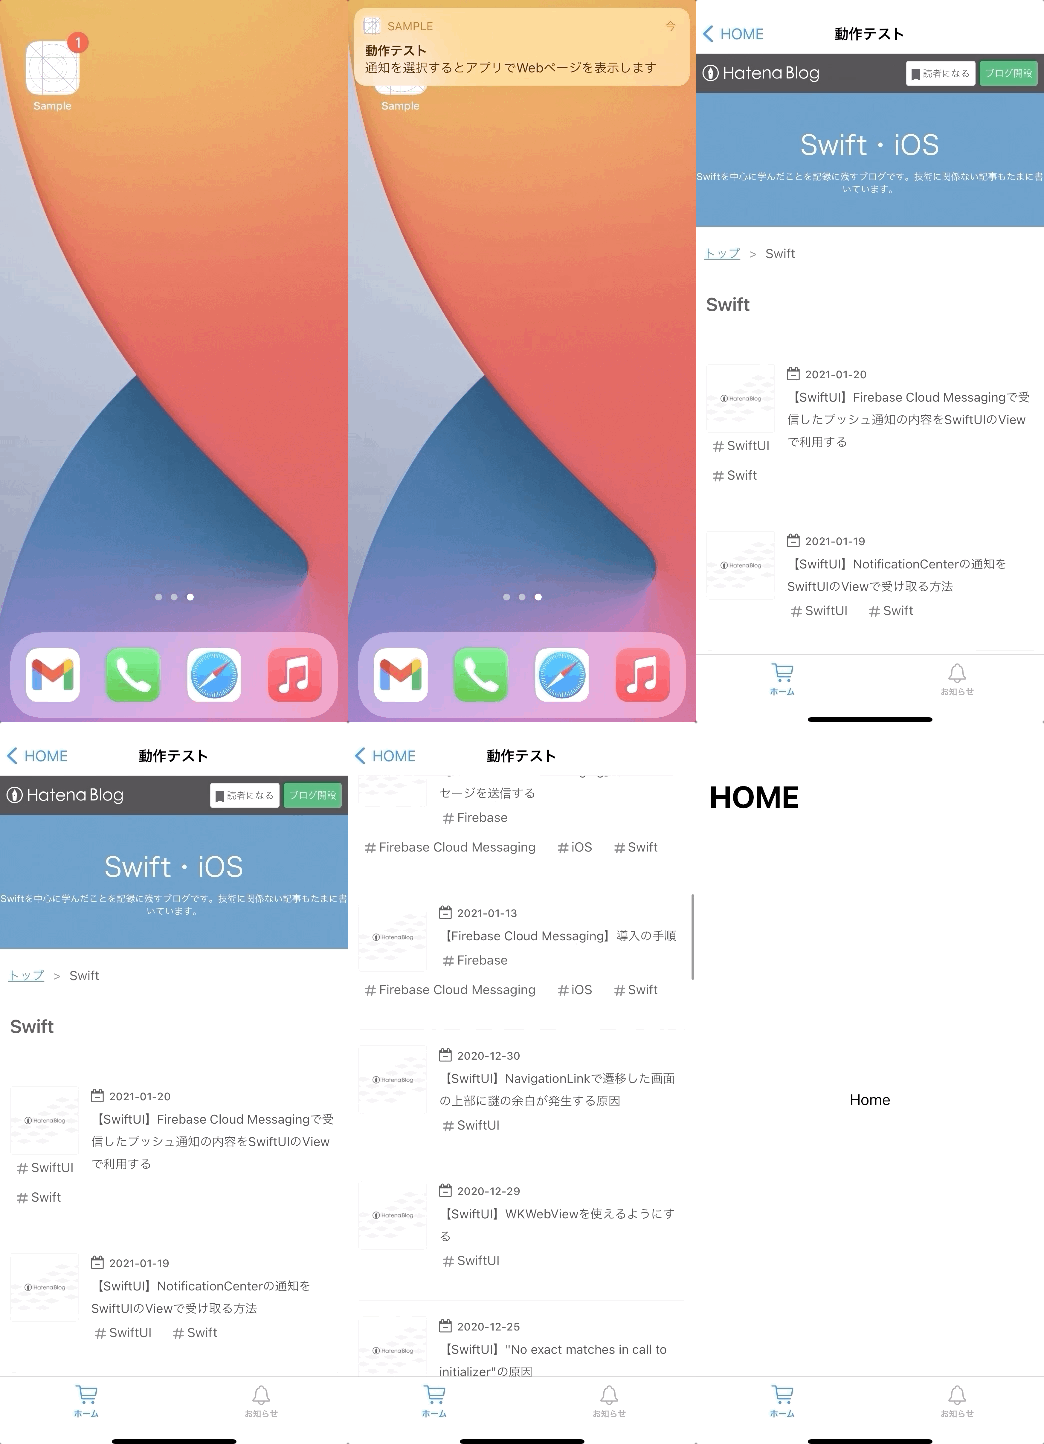
動作イメージ
- Firebase Cloud Messagingで送信されたプッシュ通知をユーザーが選択する
- アプリが開いて自動でWKWebViewが実装された画面に遷移する
- プッシュ通知のペイロードに含まれるURLを使ってWebページを表示する

全体の実装
AppDelegate.swift
import UIKit
import Firebase

@main
class AppDelegate: UIResponder, UIApplicationDelegate, MessagingDelegate {

    func application(_ application: UIApplication, didFinishLaunchingWithOptions launchOptions: [UIApplication.LaunchOptionsKey: Any]?) -> Bool {
        FirebaseApp.configure()

        UNUserNotificationCenter.current().delegate = self

        let authOptions: UNAuthorizationOptions = [.alert, .badge, .sound]
        UNUserNotificationCenter.current().requestAuthorization(
            options: authOptions,
            completionHandler: {_, _ in })

        application.registerForRemoteNotifications()

        Messaging.messaging().delegate = self

        return true
    }

    // UIApplicationDelegateのapplication(_:configurationForConnecting:options:)メソッドと
    //application(_:didDiscardSceneSessions:)メソッドは変更箇所がないため省略
}

extension AppDelegate: UNUserNotificationCenterDelegate {
    // 通知が到着した時の挙動
    func userNotificationCenter(_ center: UNUserNotificationCenter,
                                willPresent notification: UNNotification,
                                withCompletionHandler completionHandler: @escaping (UNNotificationPresentationOptions) -> Void) {
        // バナーと音で通知が到着したことを知らせる
        completionHandler([[.banner, .sound]])
    }

    // 通知を選択した時の挙動
    func userNotificationCenter(_ center: UNUserNotificationCenter, didReceive response: UNNotificationResponse, withCompletionHandler completionHandler: @escaping () -> Void) {
        // 通知のペイロードを送る
        let userInfo = response.notification.request.content.userInfo
        NotificationCenter.default.post(name: Notification.Name("didReceiveRemoteNotification"),
                                        object: nil, userInfo: userInfo)

        completionHandler()
    }
}
SceneDelegate.swift
import UIKit
import SwiftUI

class SceneDelegate: UIResponder, UIWindowSceneDelegate {

    var window: UIWindow?

    func scene(_ scene: UIScene, willConnectTo session: UISceneSession, options connectionOptions: UIScene.ConnectionOptions) {
        let rootView = RootView()
            .environmentObject(RootViewModel())
            .environmentObject(PushDetailViewModel())

        if let windowScene = scene as? UIWindowScene {
            let window = UIWindow(windowScene: windowScene)
            window.rootViewController = UIHostingController(rootView: rootView)
            self.window = window
            window.makeKeyAndVisible()
        }
    }

    // 変更不要な実装箇所に関しては省略
}
RootView.swift
import SwiftUI

struct RootView: View {
    @EnvironmentObject var viewModel: RootViewModel

    var body: some View {
        TabView(selection: $viewModel.selection) {
            HomeView()
                .tabItem {
                    Image(systemName: "cart")
                    Text("ホーム")
                }
                .tag(1)

            NewsListView(viewModel: NewsListViewModel())
                .tabItem {
                    Image(systemName: "bell")
                    Text("お知らせ")
                }
                .tag(2)
        }
    }
}
RootViewModel.swift
import SwiftUI
import Combine

class RootViewModel: ObservableObject {
    // 選択しているタブを保持するための変数
    @Published var selection = 1

    var cancellable: AnyCancellable?

    init() {
        // プッシュ通知選択時に通知を受け取る
        cancellable = NotificationCenter.default
            .publisher(for: Notification.Name("didReceiveRemoteNotification"))
            .sink { _ in
                // 「ホーム」タブを表示する
                self.selection = 1
            }
    }
}
HomeView.swift
import SwiftUI

struct HomeView: View {
    @EnvironmentObject var pushDetailViewModel: PushDetailViewModel

    var body: some View {
        NavigationView {
            VStack {
                NavigationLink(
                    destination: PushDetailView(),
                    isActive: .constant(pushDetailViewModel.isActivePushDetailView),
                    label: {
                        EmptyView()
                    }
                )

                Text("Home")
            }
            .navigationTitle("HOME")
        }
    }
}
PushDetailView.swift
import SwiftUI

struct PushDetailView: View {
    @EnvironmentObject var viewModel: PushDetailViewModel

    var body: some View {
        WebView(urlString: viewModel.urlString)
            .navigationTitle(viewModel.title)
            .navigationBarTitleDisplayMode(.inline)
            .onDisappear(perform: {
                viewModel.isActivePushDetailView = false
            })
    }
}
PushDetailViewModel.swift
import SwiftUI
import Combine

class PushDetailViewModel: ObservableObject {
    // プッシュ通知選択時にPushDetailViewへの画面遷移を実行するためのプロパティ
    @Published var isActivePushDetailView = false
    // PushDetailViewのタイトル
    var title = ""
    // PushDetailViewに表示するページのURL
    var urlString = ""

    var cancellable: AnyCancellable?

    init() {
        // プッシュ通知選択時に通知を受け取る
        // PushDetailViewに表示するタイトルとページのURLを取得
        // 変数isActivePushDetailViewの値を変更することでPushDetailViewへの画面遷移処理を発火させる
        cancellable = NotificationCenter.default
            .publisher(for: Notification.Name("didReceiveRemoteNotification"))
            .sink { notification in
                if let userInfo = notification.userInfo, let aps = userInfo["aps"] as? [AnyHashable: Any], let alert = aps["alert"] as? [AnyHashable: Any], let title = alert["title"], let urlString = userInfo["url"] {
                    self.title = title as? String ?? ""
                    self.urlString = urlString as? String ?? ""
                    self.isActivePushDetailView = true
                }
            }
    }
}
WebView.swift
import SwiftUI
import WebKit

struct WebView: UIViewRepresentable {
    var urlString: String

    class Coordinator: NSObject, WKUIDelegate, WKNavigationDelegate {
        var parent: WebView

        init(_ parent: WebView) {
            self.parent = parent
        }

        // "target="_blank""が設定されたリンクも開けるようにする
        func webView(_ webView: WKWebView, createWebViewWith configuration: WKWebViewConfiguration, for navigationAction: WKNavigationAction, windowFeatures: WKWindowFeatures) -> WKWebView? {
            if navigationAction.targetFrame == nil {
                webView.load(navigationAction.request)
            }
            return nil
        }

        // URLごとに処理を制御する
        func webView(_ webView: WKWebView, decidePolicyFor navigationAction: WKNavigationAction, decisionHandler: (WKNavigationActionPolicy) -> Void) {
            if let url = navigationAction.request.url?.absoluteString {
                if (url.hasPrefix("https://apps.apple.com/")) {
                    guard let appStoreLink = URL(string: url) else {
                        return
                    }
                    UIApplication.shared.open(appStoreLink, options: [:], completionHandler: { (succes) in
                    })
                    decisionHandler(WKNavigationActionPolicy.cancel)
                } else if (url.hasPrefix("http")) {
                    decisionHandler(WKNavigationActionPolicy.allow)
                } else {
                    decisionHandler(WKNavigationActionPolicy.cancel)
                }
            }
        }
    }

    func makeCoordinator() -> Coordinator {
        Coordinator(self)
    }

    func makeUIView(context: Context) -> WKWebView {
        let webView = WKWebView()

        return webView
    }

    func updateUIView(_ webView: WKWebView, context: Context) {
        // makeCoordinatorで生成したCoordinatorクラスのインスタンスを指定
        webView.uiDelegate = context.coordinator
        webView.navigationDelegate = context.coordinator

        // スワイプで画面遷移できるようにする
        webView.allowsBackForwardNavigationGestures = true

        guard let url = URL(string: urlString) else {
            return
        }
        let request = URLRequest(url: url)
        webView.load(request)
    }
}
補足
- 【Firebase Cloud Messaging】導入の手順 - Swift・iOSに記載の設定が完了している前提です。
- RootView.swiftに実装されているNewsListViewとNewsListViewModelに関しては、この記事の内容に関係がないため省略します。実際に動かしてみたい場合は、"NewsListView(viewModel: NewsListViewModel())"の部分を"Text("テスト")"などに置き換えてください。
- 実装後、プッシュ通知を送って動きを確認する場合は、【Firebase Cloud Messaging】テストメッセージを送信する - Swift・iOSに記載の手順を参考にしてください。また、送信設定「その他のオプション(省略可)」の「カスタムデータ」欄で、「キー」に「url」、「値」に遷移させたいURLを入力した上で送信してください。
- 【SwiftUI】Firebase Cloud Messagingで受信したプッシュ通知の内容をSwiftUIのViewで利用する - Swift・iOSに記載したような方法を採用しなかったのは、今回MVVMを意識して実装したためです。上記の記事の方法で実装すると、「Viewの表示に必要なプロパティ」を、Viewが変更することになってしまうため、Viewの責務を超えてしまうと思いました。そのため、「Viewの表示に必要なプロパティ」を変更する処理に関してはViewModelに実装するようようにしました。
おわりに
今回はシンプルな画面遷移のみ実装となっているため、今後、プッシュ通知の種類によって画面遷移や処理を分ける実装をする機会があれば試したいと思います。
参考
- https://developer.apple.com/documentation/foundation/notificationcenter
-
https://developer.apple.com/documentation/foundation/notificationcenter/1410608-post
-
https://developer.apple.com/documentation/foundation/notificationcenter/3329353-publisher
-
https://quipper.hatenablog.com/entry/2020/12/24/swiftui-deeplinking
- 【Firebase Cloud Messaging】導入の手順 - Swift・iOS
- 【Firebase Cloud Messaging】テストメッセージを送信する - Swift・iOS